Guide
Alfalfa Without the Slime
Alfalfa is the finest seed most people attempt and the one that punishes drainage errors hardest. The fix is mechanical rather than mysterious.
As an Amazon Associate this site earns from qualifying purchases. Links to products may be affiliate links. This costs you nothing extra and does not change what gets recommended. Nothing here is medical advice.
Alfalfa is the sprout most people picture when they hear the word: a fine white tangle with green tips, the thing that used to appear in every sandwich in the nineteen eighties. It is delicate, mild, and genuinely lovely on a piece of buttered bread.
It is also the seed that produces the most complaints, and almost all of them describe the same failure. The batch turns slimy, develops a smell, and gets thrown away around day four. That failure has a mechanical cause and a mechanical fix.
Why alfalfa behaves differently
Alfalfa seed is tiny. A single seed is smaller than a pinhead, which means a tablespoon contains an enormous number of individual seeds and an enormous amount of combined surface area.
Surface area is the whole story. Water clings to surfaces, and a mass of very fine seed holds far more water after draining than an equivalent mass of beans does. A jar of mung that looks drained is drained. A jar of alfalfa that looks drained is still wet throughout.
Fine seed also mats. As roots emerge they knit into each other, and by day three the mass has become a single felted structure rather than a collection of individual sprouts. Water cannot move through a felt. Whatever is trapped in the middle stays there.
The slime people describe is the result: a warm, permanently wet interior with no airflow, which is precisely the condition every part of this process exists to prevent. It is not a property of alfalfa. It is a drainage failure that alfalfa reveals and other seeds hide.
Quantity, which is the first fix
Two tablespoons of dry alfalfa seed for a one litre jar. Not a quarter cup, not a handful.
Alfalfa expands more dramatically than almost anything else in this category. Two tablespoons of dry seed will fill a one litre jar loosely by day five, and three tablespoons will pack it. Packing is what creates the impenetrable core.
Most people who report slime started with too much seed. Halving the quantity resolves the problem for a large share of them without changing anything else.
The soak
Four to six hours only. Alfalfa hydrates fast and a long soak actively harms it.
An overnight soak, which is the correct instruction for beans, drowns fine seed. The embryo has absorbed what it needs within a few hours, and every additional hour submerged is time spent in a warm nutrient bath with nothing useful happening.
Rinse the dry seed first, then soak in cool water to three times its depth, then drain completely. Do not skip the initial rinse. Fine seed carries proportionally more field dust than large seed does.
Drainage, which is the second fix
Steeper than you would use for beans, and checked every single time.
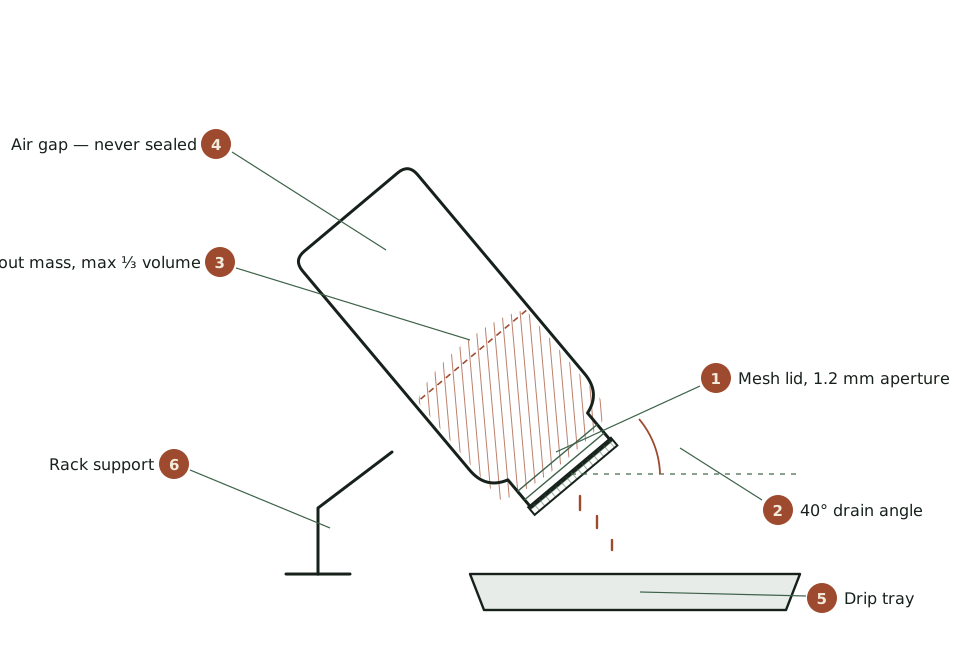
Set the jar mouth down at a genuinely steep angle, closer to sixty degrees from horizontal than to forty five. The hub page shows the geometry, and alfalfa sits at the demanding end of it. A shallow angle that works perfectly well for mung will pool water under alfalfa.
Leave it draining rather than standing it upright between rinses. The jar should live mouth down in a rack and only come upright to be rinsed.
The spin out, which is the third fix
This is the technique that separates people who succeed with alfalfa from people who give up, and it takes four seconds.
After each rinse, drain the jar, then hold it firmly and swing it in a short sharp arc, mouth down, the way you would flick water off your hand. Centrifugal force throws out the water that gravity alone will not move from a felted mass.
Do this twice after every rinse. The difference in how much water leaves the jar is immediately obvious, and it is the difference between a clean batch and a slimy one.
A stainless lid such as a stainless mesh sprouting lid makes the spin out easier, since a warped plastic lid shifts under the force. Anyone who finds this awkward with a glass jar should consider a tray system instead, since spreading fine seed thin achieves the same result by geometry rather than by technique. Jars, trays, and automatic sprouters covers where that tradeoff falls.
Days one to five
Day one. Rinse and spin out twice daily. The seed swells and the first root tips appear as fine white threads.
Day two. The mass begins to mat. Rinse vigorously enough to break it apart, which takes more energy than you expect. Swirl hard, then spin out.
Day three. Roots are established and the mass now behaves as a single body. Keep rinsing hard. This is the day most failures become irreversible, and a batch that smells sour on day three will not recover.
Day four. Shoots lengthen and the first pale leaves appear. Still white or very pale yellow.
Day five. Move the jar into indirect light for a few hours to green the leaves. Direct sun will cook them. A shaded windowsill is right. Harvest once the tips are green.
Mixing alfalfa with other seeds
Salad sprout mixes are sold everywhere and they are appealing: alfalfa, radish, clover, and mustard in one jar, producing a tangle with several flavours and colours. Blending your own is cheaper and gives you control over the proportions.
It also fails more often than single seed batches, for a reason that is easy to miss. Seeds with different cycle lengths cannot share a jar successfully. Radish is ready in three to five days. Alfalfa wants five or six. Whichever you harvest for, the other is either underdeveloped or past its best, and the seeds that finished early begin deteriorating while their neighbours are still growing.
The workable rule is to mix only seeds with similar cycles and similar sizes. Alfalfa, clover, and fenugreek run close enough together to share a jar. Radish and mustard also pair well with each other. Combining a fine four day seed with a coarse two day bean produces a batch where half the contents are wrong whenever you pull it.
Size matters as much as timing. A mix of very fine and much larger seeds stratifies during rinsing, with the small seeds settling into the gaps between the large ones and forming exactly the dense pockets that will not drain. A blend of similar sized seeds stays evenly distributed.
Proportion is worth thinking about too, because flavour intensity varies enormously. Radish and mustard are assertive, and a mix that is a quarter radish by volume will taste overwhelmingly of radish. Alfalfa and clover are mild and can carry a much larger share. Start with roughly eighty percent mild seed and twenty percent sharp, then adjust once you have tasted a batch.
The simplest approach for anyone new to this is to run separate jars and combine the finished sprouts on the plate. It costs one extra jar and removes every one of the problems above.
Hull removal
Alfalfa hulls are small brown fragments that separate during the last two days. They are edible and they hold moisture, which shortens shelf life.
Tip the finished batch into a large bowl of cold water and agitate with your hand. Hulls float and sprouts sink. Skim the surface, pour off, and repeat once. Two passes remove most of them and a third is wasted effort.
This step matters more for alfalfa than for beans, because the sheer number of hulls in a fine seed batch is large enough to affect how long the sprouts keep.
Greening, at the end
The final step is optional and takes a few hours rather than a day.
Once shoots have lengthened and the leaves are formed but still pale, move the jar into indirect light. A shaded windowsill or a bright room away from the glass is right. The leaves develop chlorophyll and turn green over three to six hours, and the flavour freshens slightly along with the colour.
Direct sunlight through glass will heat the jar and cook the sprouts, which is the one way to ruin an otherwise successful batch at the last moment. Keep the jar out of any beam that lands on it.
Rinse and drain as normal during greening. The mass is at its densest at this point and the drainage requirement has not relaxed just because the crop is nearly finished.
RUN THE NUMBERS
Illustrative ranges only. Costs vary by supplier and region, and nothing here predicts your results.
| Input | Per batch |
|---|---|
| Dry seed | 2 tablespoons |
| Soak | 4 to 6 hours |
| Rinses | Twice daily, plus spin out |
| Elapsed time | 4 to 6 days |
| Finished yield | Roughly 4 cups, very light |
| Refrigerated life | 4 to 6 days after hulling and drying |
Alfalfa produces a large volume for very little seed, which makes the running cost negligible. The real cost is attention. This is a six day crop with a daily technique requirement, and it is the wrong first project for anyone who has not yet proven the habit on something forgiving.
WHAT GOES WRONG
Slimy mass with a sour smell. Too much seed, too shallow a drain angle, or no spin out. Usually all three. Halve the seed, steepen the jar, and add the spin.
A dry crust on top and wet felt underneath. Rinsing too gently. The mass has to be broken apart by the water, not merely wetted.
Grey or pink discolouration. Discard the batch. Alfalfa should be white, cream, or pale green and nothing else.
Leaves that stay yellow. Not enough indirect light at the end. A few hours in a shaded window fixes it.
Bitter or grassy flavour. Left too long, or greened in direct sun. Harvest at day five and keep the light indirect.
DO THIS NOW
- Measure exactly two tablespoons of alfalfa seed. If you have already been using more, this alone may solve your problem.
- Soak for five hours rather than overnight.
- Add the spin out to your routine from the first rinse, twice each time, and do not skip it once the mass starts matting.
- Steepen the drain angle beyond what you use for beans and check it every time you set the jar down.
Next
If drainage is the recurring theme in your failures, rinsing and drainage as safety controls explains what each of these steps actually does, and which of them is protecting you rather than merely improving the batch.
If the spin out is more fuss than you want twice a day, the vessel may be the wrong tool. Jars, trays, and automatic sprouters covers why fine seed behaves better spread thin than packed into a jar.