Hub
Fermenting Vegetables at Home
One jar of cabbage teaches the whole method: two percent salt, everything submerged, room temperature, and time.
As an Amazon Associate this site earns from qualifying purchases. Links to products may be affiliate links. This costs you nothing extra and does not change what gets recommended. Nothing here is medical advice.
One cabbage, salt, and a jar. That is the entire equipment list for the batch this hub is built around.
Shred a small white cabbage, weigh it, add two percent of that weight in salt, squeeze it hard for five minutes until it releases enough liquid to cover itself, pack it into a jar with a weight holding everything under the brine, and leave it on the counter for two to three weeks.
That is the kraut jar, and it appears throughout this hub and every guide beneath it. Two percent salt, full submersion, room temperature, and patience. Change the vegetable and those four things stay the same.
Fermenting has a reputation for being risky, which is close to backwards. Vegetable fermentation is among the safest preservation methods available to a home kitchen, and this page explains why. It is also the cheapest, since the only input beyond the vegetable is salt.
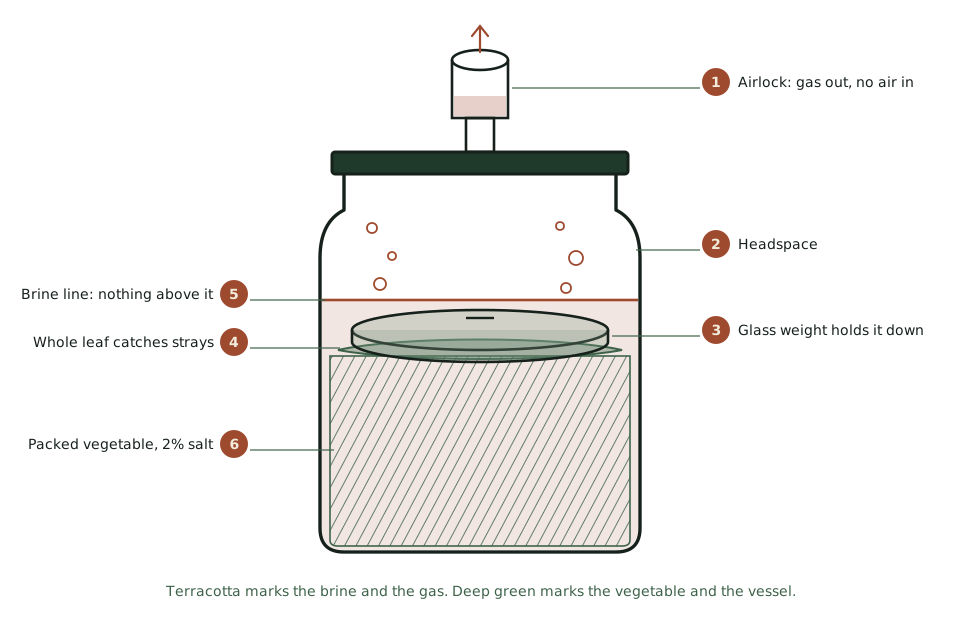
What is actually happening
Raw vegetables carry lactic acid bacteria on their surfaces. These organisms are already there, on the cabbage, in the field. You are not adding anything.
Salt does the selecting. At around two percent, most spoilage organisms are inhibited while lactic acid bacteria continue working comfortably. They consume the sugars in the vegetable and produce lactic acid.
That acid is the preservative. As it accumulates the pH falls, and as the pH falls the environment becomes progressively more hostile to anything that is not a lactic acid bacterium. The ferment protects itself, more strongly as it goes.
Three consequences follow, and they run through everything else on this page.
It gets safer over time, not riskier. The first two days are the least acidic and therefore the most vulnerable. By day five the acidity has usually established itself firmly.
You can taste the progress. Sourness is the direct sensory indicator of the thing that is preserving your food. This is unusual and genuinely useful.
Nothing is added. No starter, no culture, no equipment beyond a jar. The bacteria arrive with the vegetable.
Why this is a low risk method
Worth stating clearly, because fermentation makes people nervous in a way that drying does not.
The organism people worry about in home preserving does not grow in acidic conditions. A vegetable ferment that has soured properly has moved well below the threshold where it can develop, and it does so within days. This is why lacto-fermented vegetables have been made in domestic kitchens across the world for thousands of years without refrigeration or equipment.
Contrast this with low acid canning, where the food is sealed and heated and you cannot inspect the result. A ferment is open, visible, and tastable throughout. If something is wrong you can see it and smell it, and the failure mode is a jar you throw away rather than a hidden problem.
Two rules do the work. Keep everything under the brine, and use enough salt. Both are covered below, and both are mechanical rather than a matter of judgement.
Guidance on home fermented foods varies by country and does change, so check your own national food safety authority rather than relying on any website, including this one, particularly if you are pregnant or immunocompromised.
Salt, the number that matters
Two percent of the weight of the vegetable. This is the single most useful figure in this hub.
Weigh the prepared vegetable, multiply by 0.02, and that is your salt. Nine hundred grams of shredded cabbage takes eighteen grams of salt.
Weighing matters here more than anywhere else on this site, because volume measures for salt vary enormously with crystal size. A tablespoon of fine salt and a tablespoon of flaky salt differ by nearly half. A cheap kitchen scale removes the problem entirely.
Range. Anywhere from 1.5 to 3 percent works. Lower ferments faster and softer, higher ferments slower and crunchier. Two percent is the reliable middle.
Which salt. Any salt without additives. Fine sea salt, kosher salt, or pickling salt. Avoid table salt containing iodine or anti-caking agents, both of which can interfere with the culture and cloud the brine.
Brine method, for vegetables that do not release liquid. Cucumbers, carrots, beans, and whole vegetables will not produce enough liquid when salted directly. For these, make a brine at two to three percent salt by weight of water and pour it over. Twenty grams of salt per litre is a two percent brine.
Submersion, the one rule
Everything under the brine, always.
Lactic acid bacteria work without oxygen. Mould and kahm yeast need it. Anything sitting above the surface is in an environment that favours the things you do not want, and a single shred of cabbage floating on top is the usual origin of a mouldy jar.
The mechanics are simple. Pack the vegetable down firmly so brine rises above it, then place a weight on top to hold it there.
Glass weights are the tidiest solution and are made for this. glass fermentation weights sized for wide mouth jars sit inside a wide mouth jar and hold everything down without absorbing anything.
A whole cabbage leaf folded over the surface under the weight catches stray shreds and is a free improvement.
A small jar or a sealed bag of brine works if you have nothing else. Do not use anything metal that is not stainless, since acid and reactive metal is a poor combination.
Check on day two. The vegetable softens and settles, and a weight that sat correctly on day one is sometimes proud of the brine by day three.
The vessel, and the pressure question
Fermentation produces carbon dioxide, which has to escape. A rigidly sealed jar builds pressure.
Airlock lids let gas out and no air in, which is the ideal arrangement. a fermentation kit with airlock lids and glass weights covers a starter set with lids, airlocks, and weights together. waterless silicone airlock caps that need no topping up are the simpler version, needing no water topped up and no maintenance.
A loosely closed lid works and requires you to open it daily to release pressure, which is called burping. This is the free option and it is entirely viable. Set a reminder for the first week, when gas production is most vigorous.
A cloth over the mouth with a rubber band works for the first few days and lets in more oxygen than is ideal.
A crock is the traditional vessel and uses a water channel around the rim as a permanent airlock. Excellent for large batches, expensive, and heavy.
For a larger batch without a crock, two litre fermenting jars with airlocks and weights are the middle path, holding roughly two litres with the airlock and weight already fitted.
Never seal a fermenting jar rigidly and leave it. Glass jars can and occasionally do fail under pressure.
Temperature and time
Room temperature, meaning around eighteen to twenty two degrees Celsius, is ideal.
Warmer ferments faster and produces a softer, sometimes sharper result. Above about twenty six degrees the texture suffers noticeably and off flavours become more likely. Cooler ferments slower and produces crisper, more complex results, and below about fifteen degrees it becomes very slow indeed.
Out of direct sunlight, on a counter or in a cupboard, is right. A tray underneath catches the brine that will overflow in the first few days, which it always does.
Timing for the kraut jar. Bubbling starts around day two or three. It tastes recognisably sour by day seven. It is good from two weeks and better at three or four. There is no fixed end point, only the moment you decide it tastes right.
Taste it from day five onward, with a clean utensil, and stop when you like it. That is the whole of the timing question.
Reading the jar
Knowing normal from abnormal is most of the confidence in this practice.
Normal. Bubbles, particularly days two to seven. Cloudy brine. A sour smell that becomes pleasantly tangy. Colour dulling from bright to muted. Brine overflowing in the first days. A white film on the surface.
That white film is kahm yeast. It is harmless, it looks like a thin wrinkled skin rather than fuzz, and it forms when the surface has oxygen contact. Skim it off, check your weight is holding everything under, and continue. It can affect flavour if left for a long time.
Not normal. Fuzzy mould in any colour, black, blue, green, or pink, growing in raised spots rather than a flat film. A smell that is putrid, yeasty in a beery way, or simply wrong rather than sour. Slimy, ropy brine. Any of these means discard the jar.
The distinction that matters most is flat film versus fuzzy growth. Kahm yeast is flat and skimmable. Mould has structure and colour.
When in doubt, discard. A cabbage costs very little.
Storage
Once it tastes right, refrigerate. Cold does not stop fermentation, it slows it to a crawl, so the flavour holds roughly where you left it.
Keep everything submerged in storage too. Press the vegetable down under the brine before it goes in the refrigerator.
Refrigerated vegetable ferments keep for months, and many improve over the first few weeks in the cold. Sauerkraut in particular is often better at two months than at two weeks.
Use a clean utensil every time. Introducing crumbs or fingers is the main way a good jar goes wrong in storage.
The brine is not waste. It is excellent in dressings, in a bloody mary, and as a starter to speed up the next batch.
What ferments well
Excellent. Cabbage in every form, carrots, cauliflower, green beans, radish, turnip, beetroot, peppers, and garlic. All hold their texture and take the sourness well.
Very good. Cucumbers, with a caution. They go soft easily, and a tannin source such as a grape leaf, oak leaf, or a black tea bag in the jar helps considerably.
Difficult. Anything soft or watery to begin with. Courgette, tomato, and mushrooms all ferment and produce mushy results.
Best avoided. Leafy greens other than cabbage, which collapse entirely.
Aromatics belong in almost every jar. Garlic, dill, caraway, juniper, mustard seed, chilli, and ginger all work, and a jar with nothing but cabbage and salt is a fine but plain thing.
RUN THE NUMBERS
Illustrative figures. Times vary considerably with temperature and vegetable.
| The kraut jar | |
|---|---|
| Cabbage | 1 small head, roughly 900 g shredded |
| Salt | 18 g, being 2 percent by weight |
| Working time | About 15 minutes |
| Vessel | 1 litre wide mouth jar with a weight |
| Temperature | 18 to 22 C |
| First bubbles | Day 2 to 3 |
| Ready from | 2 weeks, better at 3 to 4 |
| Keeps refrigerated | Several months |
| Vegetable | Salt method | Typical time | Note |
|---|---|---|---|
| Cabbage | 2 percent, dry salted | 2 to 4 weeks | The default |
| Carrot sticks | 2.5 percent brine | 1 to 2 weeks | Stays crunchy |
| Cucumber | 3 percent brine | 1 to 2 weeks | Add a tannin source |
| Cauliflower | 2.5 percent brine | 1 to 2 weeks | Holds texture well |
| Radish | 2 percent brine | 5 to 10 days | Fast, pungent |
| Green beans | 3 percent brine | 1 to 2 weeks | Excellent with dill |
A cabbage and eighteen grams of salt produces about a litre of sauerkraut. That is the cheapest preserved food anywhere on this site.
WHAT GOES WRONG
Fuzzy mould on the surface. Something was above the brine. Discard, and use a proper weight next time.
A white flat film. Kahm yeast, harmless. Skim it and check the weight.
Mushy texture. Too warm, too little salt, or a vegetable that was never going to hold up. Move somewhere cooler and check your percentage by weight.
No bubbles after four days. Too cold, or too much salt. Move it somewhere warmer and be patient.
Brine all over the counter. Entirely normal in the first days. Stand the jar on a tray.
Not enough liquid to cover. The vegetable did not release enough. Top up with a two percent brine rather than plain water.
Unbearably salty. Measured by volume rather than weight. Weigh it.
Making the kraut jar, step by step
The method in full, since everything above is principle and this is practice.
Remove and keep one outer leaf. Set it aside. It becomes the cover that catches stray shreds.
Quarter and core the cabbage, then shred. Thin shreds ferment faster and pack tighter. A knife is fine and a mandoline is faster.
Weigh the shredded cabbage. This is the step people skip and it is the one that makes the whole thing reliable. Put the bowl on the scale and note the number.
Calculate and add the salt. Multiply the weight by 0.02. Scatter it over the cabbage rather than dumping it in one place.
Squeeze, hard, for five minutes. Massage the salted cabbage with both hands. It will resist for two minutes, then soften, then start releasing liquid. By minute five there should be a visible pool in the bottom of the bowl. This is the brine, and it comes out of the cabbage rather than being added.
Pack into the jar, pressing down as you go. Push each handful down firmly with a fist or a wooden tamper. The brine should rise above the cabbage as you compress it.
Pour in every drop of remaining liquid from the bowl.
Fold the reserved leaf over the surface and tuck the edges down.
Add the weight, press until brine covers it, and fit the lid or airlock.
Leave two to three centimetres of headspace. Ferments expand and overflow, and a jar filled to the brim will make a mess.
Stand it on a tray, out of direct sun, at room temperature.
That is fifteen minutes of work for a litre of sauerkraut.
The first week, day by day
Knowing what to expect removes most of the anxiety.
Day one. Nothing visible. The brine may look slightly cloudy at the base.
Day two to three. Bubbles appear, first as small clusters clinging to the glass and then rising. Brine level rises and may overflow. This is the most active phase and the point at which a rigidly sealed jar becomes a problem.
Day four to five. Bubbling peaks and begins to slow. The colour dulls from bright green-white to a softer cream. The smell becomes distinctly sour rather than cabbagey.
Day six to seven. Taste it, with a clean fork. It will be recognisably sauerkraut, still mild and still fairly crunchy. Some people stop here.
Week two. Sourness deepens and the texture softens slightly. Bubbling is minimal.
Week three to four. The flavour rounds out and becomes more complex. This is where most people find their preference.
Push the vegetable back under the brine every time you open the jar, and use a clean utensil each time.
Scaling up
Once the method is familiar, larger batches follow the same rules and one extra consideration.
The salt percentage does not change. Two percent of five kilograms is one hundred grams, calculated exactly as it was for one cabbage.
The vessel does change. Beyond about two litres, packing and weighting become awkward in a mason jar, and this is the point at which two litre fermenting jars with airlocks and weights or a proper crock earns its place.
A tamper becomes useful at scale. Squeezing five kilograms by hand is genuine work, and a wooden tamper compresses the vegetable in the vessel instead, which is faster and less tiring.
Temperature control matters more with a large batch, since a big vessel holds heat and the centre can run warmer than the room.
Split the difference if you are unsure: two or three medium jars rather than one large vessel. They ferment more evenly, they are easier to handle, and if one goes wrong you lose a third rather than everything.
Beyond vegetables
Vegetable fermentation is the entry point and the same principles extend, with different organisms doing the work.
Kimchi is a vegetable ferment with a paste of chilli, garlic, ginger, and often fish sauce, usually built on napa cabbage and salted in brine first rather than dry salted. Same rules, more ingredients.
Kefir and yoghurt are milk ferments driven by added cultures rather than wild bacteria. They are fast, taking a day or two, and they need a starter such as live milk kefir grains.
Kombucha ferments sweetened tea using a culture of bacteria and yeast. It requires a starter and it works aerobically, which inverts the submersion rule entirely.
Sourdough is a flour and water ferment maintained continuously rather than made in batches.
Vinegar is a second stage ferment, where alcohol is converted to acetic acid by different bacteria again.
All of these are worth exploring and none of them shares the specific method on this page. Vegetable fermentation is the one that needs no starter, no equipment, and no maintenance, which is why it is the right place to begin.
Using what you make
A jar of sauerkraut that lives untouched in the refrigerator is the fermenting equivalent of a dried pantry nobody opens, and the fix is knowing what to do with it.
Alongside rich food. The traditional use and still the best one. Sourness cuts fat, which is why kraut sits next to sausage, pork, and cheese across so many cuisines. A forkful next to something rich changes the whole plate.
In sandwiches. A reuben is the famous version. Any sandwich with cheese or cured meat improves with a layer.
Stirred through grains at the end. Warm rice, barley, or lentils with kraut folded in off the heat. Do not cook it, since heat destroys the texture and most of what makes it interesting.
On eggs. Fermented vegetables and eggs are an underrated combination, particularly with something spicy.
In salads instead of dressing. Kraut brings acidity and salt at once, which means a salad containing it needs little more than oil.
The brine. Do not pour it away. It makes an excellent base for a salad dressing, it goes into a bloody mary, it seasons a soup, and a splash of it will speed up your next batch by introducing an established population.
One note on heat. Fermented vegetables contain live cultures, and cooking them kills those. That does not make cooked kraut worthless, since the flavour survives, but if the culture is part of why you are eating it then add it at the end rather than at the beginning.
Cost and yield
The economics here are the strongest of any hub on this site, and worth spelling out.
A cabbage and eighteen grams of salt produce roughly a litre of sauerkraut. The salt costs almost nothing. The cabbage is among the cheapest vegetables available and is cheapest of all in late autumn when it is in season.
Compare that with a retail jar of live sauerkraut, which is priced as a speciality product and usually sold in modest quantities. The gap is large enough that a single batch pays for a fermentation kit within a few jars.
Equipment costs are one time and low. A wide mouth jar, a weight, and either an airlock or the discipline to burp daily. Everything else is optional.
The real input is time rather than money, and most of that time is waiting. Fifteen minutes of work produces a jar that then looks after itself for three weeks.
Scaling makes the economics better still. Late autumn cabbage bought by the sack and fermented in a large vessel is close to free food, and it keeps through winter, which is precisely why the practice exists.
Where to start
All ten guides are live. Make the kraut jar first: one cabbage, two percent salt, a weight, and three weeks. Sauerkraut from one cabbage walks the whole batch through, including why the five minute squeeze matters.
If you are starting from nothing, fermenting equipment and what you can skip sorts the useful from the merely available, and the honest answer is that a kitchen scale matters more than any fermenting accessory.
Around day four you will see something on the surface and want a straight answer. Reading a fermenting jar gives it: flat film is harmless yeast, fuzzy growth means discard.
Then whole vegetables, which need a brine poured over rather than salt drawn out. Brine pickles that stay crunchy covers the three things that stop cucumbers going soft, starting with the blossom end nobody mentions.
Then the two most requested ferments. Kimchi without a recipe teaches the four stages so the ingredient list stops mattering. Fermented hot sauce turns a cheap bag of chillies into several bottles.
Three ferments run on entirely different rules and deserve reading before you start them. Yoghurt and kefir need a starter, need warmth, and finish in a day. Kombucha needs oxygen rather than excluding it, which inverts almost everything else here. A sourdough starter is a pet rather than a product, kept alive continuously.
And because cold slows fermentation rather than stopping it, every jar keeps changing: storing what you ferment covers how long each kind actually lasts.
The sprouting hub, the juicing hub, and the dehydrating hub are all complete. Dehydrating and fermenting pair naturally, since both turn a glut into something that keeps.
Guides in this hub
- Brine Pickles That Stay CrunchyWhole vegetables need a brine rather than dry salting, and cucumbers need three specific things to avoid going soft.
- Fermenting Equipment, and What You Can SkipA jar, a weight, and a way for gas to escape. Everything beyond that is convenience, and here is which conveniences are worth buying.
- Storing What You FermentCold slows fermentation rather than stopping it, which means every jar keeps changing. Here is how long each kind actually lasts.
- Reading a Fermenting JarWhich films, smells, and cloudiness are normal, which mean discard, and how to tell the difference with confidence.
- Fermented Hot Sauce From a Bag of ChilliesFerment the chillies first and the sauce gains a depth that vinegar alone never produces. Two weeks of waiting and ten minutes of work.
- Yoghurt and Kefir, Which Work DifferentlyMilk ferments need a starter, need warmth, and finish in a day. Almost everything on the vegetable pages does not apply.
- Kimchi Without a RecipeBrine the cabbage, make a paste, combine, ferment. Once the structure is clear the ingredient list stops mattering.
- Kombucha, and Why It Breaks the RulesSweet tea, a culture, and air. Kombucha inverts almost every rule the vegetable ferments run on, starting with oxygen.
- Sauerkraut From One CabbageFifteen minutes of work, two percent salt, and three weeks of waiting produces a litre of the cheapest preserved food there is.
- A Sourdough Starter, and Keeping It AliveFlour and water and a fortnight. The starter is the project; the bread is what you do with it afterwards.