Hub
Dehydrating and Preserving at Home
The four variables that decide every batch, the conditioning step almost everyone skips, and how to store dried food so it lasts years rather than months.
As an Amazon Associate this site earns from qualifying purchases. Links to products may be affiliate links. This costs you nothing extra and does not change what gets recommended. Nothing here is medical advice.
Start with a tray of apples, because it teaches every variable at once and costs almost nothing to get wrong.
Six apples, cored and sliced to about three millimetres, dipped for two minutes in water with the juice of a lemon, laid in a single layer with space between the pieces, dried at fifty seven degrees Celsius for around eight hours, then conditioned in a jar for a week before storing.
That is the apple tray, and it appears throughout this hub and every guide beneath it. Uniform thickness, a pre-treatment, airflow, a moderate temperature, and a conditioning step. Change the food and those five things stay the same.
Drying is the oldest food preservation method there is and the most forgiving of the modern ones. Nothing can go dangerously wrong with a tray of fruit in the way it can with canning, the equipment is inexpensive, and a failed batch costs you an afternoon rather than a shelf of jars. It is a good place to start preserving.
What drying actually does
Drying does not remove all the water. It removes enough that what remains is unavailable.
The concept that matters is water activity, which describes how much of the water in a food is free to participate in reactions rather than bound up in sugars, proteins, and fibre. Bacteria, yeasts, and moulds need free water. Below a certain threshold they cannot grow, and the food becomes shelf stable at room temperature.
This is why a dried apricot is soft and still keeps for a year. It contains a good deal of water by weight, and almost none of it is available. It is also why partially dried food is riskier than either fresh or fully dried: it sits in the range where growth is possible and the appearance suggests it is not.
Two practical consequences follow, and they run through everything else on this page.
Dryness has to be even, not just average. A tray where most pieces are perfect and three are damp will spoil at those three pieces, and the moisture will migrate to the rest in the jar. This is exactly what conditioning exists to catch.
Dry enough is a specific state you can test for, not a matter of judgement by eye. Every guide below gives the test for its food.
The four variables
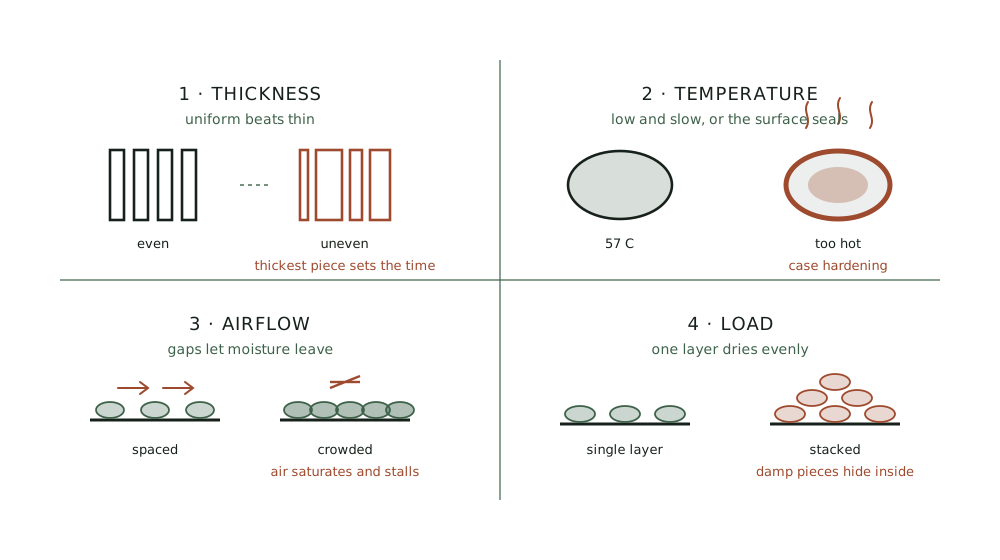
Every batch is governed by four things. Master them once and the food becomes a detail.
Thickness, and above all uniformity. Three millimetres for most fruit and vegetables. The absolute number matters less than every piece being the same, because drying time is set by the thickest piece while everything thinner overdries waiting for it. This is the single biggest quality variable and the reason a mandoline is the most useful tool in this whole category.
Temperature. Lower than people expect. Around fifty seven degrees Celsius for fruit and vegetables, a little lower for herbs, higher for meat. Too hot causes case hardening, where the surface dries into a shell that seals moisture inside. The food looks finished and is not, which is the most common serious error in home drying.
Airflow. Drying is evaporation, and evaporation stops when the surrounding air is saturated. Air has to move across every surface and carry moisture away. This is why a single layer with gaps between pieces beats a crowded tray, and why fan placement is the main thing separating machines.
Load. A full machine takes considerably longer than a half full one and dries less evenly. Rotating trays partway through corrects most of it.
The machines
Shelf or box dehydrators have a fan at the back and trays that slide in horizontally, so air moves across each shelf in parallel. Drying is even, trays rarely need rotating, and the shelves pull out without disturbing anything above. a stainless shelf dehydrator with rear-fan airflow is the standard form, and a larger six tray machine is the same design with more capacity for anyone drying a harvest rather than a snack.
Stackable dehydrators have a fan in the base or lid and air travels vertically through stacked rings. They cost less, they store inside themselves, and capacity expands by adding tiers. The tradeoff is evenness, since the tray nearest the fan dries fastest, so rotation partway through matters. a stackable dehydrator with a base-mounted fan is a good example, and this design is a sensible first purchase.
An oven works if it will hold a low temperature, and many will not go below eighty degrees, which is too hot for fruit. Propping the door open with a wooden spoon helps moisture escape and wastes a great deal of energy over eight hours. Workable for an occasional batch, poor as a habit.
An air fryer with a dehydrate setting handles small quantities well and has almost no capacity. Fine for herbs and a handful of apple slices.
One accessory is worth naming early. Plastic mesh trays stain, warp, and hold odours. stainless replacement trays solve all three and are the first upgrade most people make.
Preparation
Slice uniformly. A mandoline does this in a fraction of the time a knife takes and with a consistency no knife achieves. Use the guard, every time, without exception.
Pre-treat fruit that browns. Apples, pears, bananas, and peaches oxidise as they dry and turn an unappetising brown. Two minutes in water with lemon juice, roughly one lemon per litre, prevents it almost entirely. Ascorbic acid powder works better and costs more. This is cosmetic rather than a safety measure, and it makes a large difference to whether anyone eats the result.
Blanch dense vegetables. Carrots, beans, peas, and broccoli dry better and rehydrate far better after two to three minutes in boiling water followed by an ice bath. Blanching deactivates the enzymes that continue degrading colour and flavour during storage.
Skin matters. Grapes, blueberries, and cranberries have waxy skins that resist water loss. Halve them, or dip briefly in boiling water to crack the surface.
Lay in a single layer with gaps. Pieces touching will stick together and dry unevenly at the contact point.
Doneness, and how to test it
Guess at this and you will either overdry everything or store food that spoils.
Cool a piece first. Warm food feels softer and more pliable than it is. Take a piece out, let it sit two minutes, then test.
Fruit should be leathery and pliable with no visible moisture when torn. Squeeze a handful: pieces should spring apart rather than clump.
Vegetables should be brittle and snap rather than bend.
Herbs should crumble between your fingers.
Meat should crack when bent but not break in half.
Under drying is the risk that matters. Over drying costs texture and nothing else.
Conditioning, the step almost everyone skips
This is the most valuable paragraph on this page.
Even a well dried batch has variation between pieces. Conditioning equalises it and reveals any piece that was not dry enough, before that piece ruins a jar you open in February.
Pack the cooled batch loosely into a clear glass jar, filling it about two thirds. Seal it and leave it on a counter where you will see it, for seven to ten days. Shake it once a day.
Watch the glass. Any condensation means moisture is still present and the batch is not dry enough, so return it to the machine for another hour or two and condition again. No condensation after a week means the moisture has equalised across every piece and the batch is ready for long term storage.
Skipping this is the single most common cause of dried food going mouldy in storage months later, and it costs nothing but patience.
Storage
Four enemies, in order of how much damage they do: moisture, oxygen, light, and heat.
Airtight glass is the best everyday container. Jars with sealing lids, filled with as little headspace as practical.
Vacuum sealing extends life substantially by removing oxygen, and is worth it for anything you are storing beyond a year.
Oxygen absorbers in a sealed jar do a similar job for less money and are the standard approach for long term storage.
Dark and cool matters more than people expect. Light degrades colour and vitamins, and every ten degrees of storage temperature roughly halves shelf life. The back of a cool cupboard beats a shelf near the oven by years.
Label everything with contents and date. Dried apple and dried pear are indistinguishable at eleven months.
Realistic expectations, stored well: fruit one year or more, vegetables one to two years, herbs one year for good flavour, jerky one to two months at room temperature and longer refrigerated.
The one genuine safety point
Everything on this page is low risk except drying meat, and that exception is worth stating clearly and once.
Fruit, vegetables, and herbs dried to the tests above are shelf stable and safe. The failure mode is spoilage you can see and smell, and the cost is a wasted jar.
Meat is different. Drying alone does not reliably eliminate pathogens, because the temperatures used are low and the surface dries first. Current guidance in most countries is that meat should be heated to a specified internal temperature either before or after drying, rather than relying on the drying itself. Marinades containing salt and acid contribute but are not a substitute for that heat step.
Check your own national food safety authority for the current temperature and method rather than following any website, including this one. The jerky guide below covers the pattern in more detail.
What dries well
Excellent. Apples, pears, bananas, mangoes, apricots, tomatoes, mushrooms, onions, peppers, herbs, chillies, and citrus zest. Fruit leathers from any purée.
Good with preparation. Carrots, green beans, peas, and broccoli, all blanched first. Grapes and berries, halved or dipped.
Difficult. Anything with high fat content. Fat does not dry, it goes rancid, which is why lean cuts are specified for jerky and why avocado and olives are poor candidates.
Not worth it. Lettuce, cucumber, and watermelon are almost entirely water and leave very little behind. Whole eggs and dairy need equipment beyond a home dehydrator.
RUN THE NUMBERS
Illustrative figures based on typical produce. Times vary considerably with humidity, load, and machine.
| The apple tray | |
|---|---|
| Apples | 6 medium |
| Slice thickness | About 3 mm |
| Pre-treatment | 2 minutes in water with one lemon |
| Temperature | About 57 C |
| Drying time | Roughly 8 hours |
| Yield | Around 250 g dried |
| Conditioning | 7 to 10 days in a jar |
| Storage life | A year or more, cool and dark |
| Food | Temperature | Typical time | Done when |
|---|---|---|---|
| Herbs | 35 to 40 C | 2 to 4 hours | Crumbles |
| Fruit | 55 to 60 C | 6 to 12 hours | Leathery, pliable |
| Vegetables | 50 to 55 C | 6 to 10 hours | Brittle, snaps |
| Fruit leather | 55 to 60 C | 6 to 8 hours | Tacky, not sticky |
| Jerky | Per current national guidance | 4 to 8 hours | Cracks when bent |
Drying concentrates weight roughly five to ten times for fruit, so a full machine of apples reduces to a modest jar. That ratio is worth knowing before you buy produce for a batch.
WHAT GOES WRONG
Mould in storage months later. Under drying, and no conditioning. The conditioning jar exists to catch exactly this.
A hard shell with a soft centre. Case hardening from too high a temperature. Lower it and extend the time.
Some pieces brittle, others damp. Uneven thickness, or a crowded tray. A mandoline fixes the first and a single layer with gaps fixes the second.
Brown, unappetising fruit. No acid pre-treatment. Two minutes in lemon water prevents it.
Vegetables that never rehydrate properly. Not blanched before drying.
A rancid smell after a few months. Fat content. Dry lean, and store cool and dark.
DO THIS NOW
- Slice six apples to a uniform three millimetres, using a mandoline with the guard if you have one.
- Dip them for two minutes in water with the juice of one lemon.
- Lay them in a single layer with gaps between pieces and dry at about 57 C until leathery and pliable, roughly eight hours.
- Condition in a clear jar for a week, shaking daily and watching for condensation, before storing.
Herbs need different rules
Herbs are the fastest and cheapest thing in this category and they follow rules that would ruin fruit.
Much lower temperature. Thirty five to forty degrees Celsius. Herbs carry their flavour in volatile oils, and those oils leave with the water at higher temperatures. A hot-dried herb looks fine and tastes of very little, which is the most common disappointment in home drying.
Much shorter time. Two to four hours for most soft herbs. Check early and often.
Whole rather than chopped. Dry leaves on the stem where possible and strip them afterwards. Cut surfaces lose oils faster, and stripping dry leaves is far easier than stripping fresh ones.
Store whole, crush at use. A whole dried leaf holds its oils for a year. The same leaf crushed on day one is noticeably flat by month three. Crush between your fingers as you add it to the pan.
Air drying still works for hardy herbs like rosemary, thyme, oregano, and bay. Tie small bunches and hang them somewhere dark, dry, and moving with air. It takes one to two weeks and costs nothing. Soft herbs like basil and coriander are too moist for this and mould before they dry.
Herbs are also the strongest economic case in the whole category. A supermarket jar of dried oregano costs a surprising amount for a few grams, and a single plant produces more than a household uses in a year.
Fruit leathers
Fruit leather is the most forgiving thing a dehydrator makes and the one most likely to convert a household.
Purée any fruit until completely smooth, sweeten only if the fruit genuinely needs it, and add a squeeze of lemon for both colour and brightness. Apple and pear make excellent bases for anything too watery or too tart on its own.
Spread on a solid sheet to about three millimetres, slightly thicker at the edges since edges dry first and turn brittle while the middle is still tacky. A silicone sheet or the fruit roll tray that came with the machine both work; baking parchment works and sticks more.
Dry at fifty five to sixty degrees for six to eight hours. Done means tacky to touch but not sticky to a finger, with no wet patches in the centre. Peel it off while still warm, since a cooled leather bonds harder to the sheet.
Cut into strips with scissors and roll each in parchment. Stored airtight they hold for a month at room temperature and several months refrigerated.
The best use for fruit leather is fruit that is past its best. Bruised, soft, or slightly overripe fruit purées perfectly, and this is the single most effective way to stop throwing fruit away.
Rehydrating what you have dried
Dried food you never rehydrate becomes a cupboard of jars nobody opens. Knowing how to bring it back is what makes the whole exercise worthwhile.
Vegetables go straight into liquid. Dried carrot, pepper, onion, and mushroom need no preparation before entering a soup, stew, or sauce. They rehydrate in the cooking liquid and often taste more concentrated than fresh. This is the easiest win in the category and it requires no planning at all.
Cold water rehydration takes longer and preserves more. For anything you want to eat as a vegetable rather than dissolve into a sauce, cover with cold water and refrigerate for several hours. Slower is gentler on texture.
Boiling water is fast and coarse. Fifteen to thirty minutes covered. Good for mushrooms, which release a great deal of flavour into the water, and that soaking liquid is worth keeping and using.
Keep the soaking liquid, always. It carries flavour that came out of the food, and pouring it away discards the best part. Strain it if grit is a concern.
Ratios, roughly. One part dried to two parts water by volume for most vegetables. Mushrooms take more. Fruit takes less and rarely needs rehydrating at all.
Some things do not come back. Dried fruit rehydrates to something soft rather than fresh, and dried lettuce or cucumber does not return in any useful form. Rehydration restores water, not structure.
Building a pantry you cook from
The difference between a drying habit that lasts and one that fades is whether the jars get used, and that is a matter of what you choose to dry.
Dry what you already cook with. Onion, garlic, mushroom, pepper, tomato, and herbs go into a very large share of meals. Dried mango is lovely and will sit in the cupboard.
Dry in useful portions. A jar holding exactly enough dried mushroom for one risotto gets opened. A large jar that has to be measured out gets ignored.
Make a soup base mix. Dried onion, carrot, celery, and herbs in one jar turns any pot of water into a starting point. This is the single most used jar in most dried pantries.
Dry the gluts. The whole economic argument for this category is what happens when something is cheap or free. A market box of tomatoes in September, a neighbour's plum tree, a herb plant that has bolted. Drying converts a two day surplus into a two year supply.
Keep it visible. Jars in a dark cupboard keep better and get used less. A reasonable compromise is a labelled dark cupboard near where you actually cook, rather than a cellar shelf you never open.
The tools beyond the machine
Four things make a larger difference to results than the choice of dehydrator, and three of them are cheap.
A mandoline. The single most valuable tool in this category, because uniform thickness is the largest quality variable and no knife achieves it consistently. Six apples take under two minutes rather than ten, and every slice finishes at the same moment. Use the guard every single time. Mandoline injuries are common, serious, and entirely preventable.
A kitchen scale. Weigh produce in and weigh the result out. Two things follow. You learn the real yield ratio, which is roughly five to ten to one for fruit, and that number changes how much you buy. And weight loss is the most reliable doneness indicator there is, far better than judging by eye.
Solid sheets or liners. Fruit leather, small items, and anything sticky need a solid surface. Plastic mesh stains and holds odours, and stainless or silicone solves both. This is the first upgrade most people make and it should probably be the purchase you make alongside the machine rather than after it.
Good jars. Sealing glass jars in sizes matched to how you cook. A large jar of dried mushroom gets rationed; a small jar gets used.
Two things you do not need at the start. A vacuum sealer is worth buying once you are storing beyond a year, and not before. And a second machine is the answer to a capacity problem you may never have.
Where to start
All ten guides are live. Make the apple tray first, since it teaches every variable on this page and costs almost nothing to get wrong.
Choose or upgrade the machine: shelf or stackable covers the one airflow difference between the two designs and the accessories that matter more than either.
Then fruit, the most forgiving place to learn: drying fruit properly covers thickness, the acid dip, the doneness test, and conditioning. For fruit that is already going soft, fruit leather is easier still and wastes nothing.
Then herbs, three hours and twenty degrees cooler: drying herbs without losing the flavour explains why the temperature dial decides everything.
Then vegetables, less glamorous and far more useful: drying vegetables and the blanching question. Two foods deserve their own page because drying improves them rather than preserving them, and mushrooms and tomatoes covers both plus the powders they make.
Storage decides whether any of it survives the year: storing dried food so it lasts years. Bringing it back is what makes it worth having: rehydrating what you have dried covers how often you can skip that step entirely.
Then the arrangement that decides whether the jars get opened: building a dried pantry you actually cook from.
Meat last, once the rest is routine. Jerky and the heat step you cannot skip sets out the one genuine safety requirement in this hub.
The sprouting hub and the juicing hub are both complete. Juice pulp from carrot or apple dries into an excellent soup and porridge addition, which closes a loop between the two.
Guides in this hub
- Shelf or Stackable: Choosing a DehydratorTwo designs, one real difference, and the accessories that matter more than the machine you pick.
- Building a Dried Pantry You Actually Cook FromWhat to dry, in what portions, and how to arrange it so the jars get opened rather than admired.
- Storing Dried Food So It Lasts YearsConditioning, containers, oxygen absorbers, and the four things that degrade dried food ranked by how much damage they actually do.
- Drying Fruit ProperlyThickness, the acid dip, the doneness test, and the conditioning week that decides whether a jar survives to February.
- Drying Herbs Without Losing the FlavourHerbs carry their flavour in volatile oils, and those oils leave with the water if you dry them like fruit.
- Drying Vegetables and the Blanching QuestionWhich vegetables need blanching first, which do not, and how to build the one jar you will use more than any other.
- Fruit Leather From Whatever You HaveThe most forgiving thing a dehydrator makes, and the best answer to a bowl of fruit that is going soft.
- Jerky, and the Heat Step You Cannot SkipDrying meat is the one part of this hub with a real safety requirement. Here is the pattern, and how to make jerky worth the effort.
- Mushrooms and Tomatoes, the Two Worth Doing FirstBoth take longer than anything else in the machine and both repay it more, because drying concentrates them into something better than fresh.
- Rehydrating What You Have DriedDried food you never bring back becomes a cupboard of jars nobody opens. Here is how to use it, and when not to bother rehydrating at all.