Guide
Jerky, and the Heat Step You Cannot Skip
Drying meat is the one part of this hub with a real safety requirement. Here is the pattern, and how to make jerky worth the effort.
As an Amazon Associate this site earns from qualifying purchases. Links to products may be affiliate links. This costs you nothing extra and does not change what gets recommended. Nothing here is medical advice.
Everything else in the drying hub is low risk. Fruit and vegetables dried to the tests described there are shelf stable, and the failure mode is spoilage you can see and smell.
Meat is different, and that difference is the reason this page leads with it rather than burying it near the bottom.
The safety point, stated plainly
Drying alone does not reliably eliminate pathogens in meat.
The reason is temperature. Dehydrators run at temperatures chosen to preserve food rather than cook it, and pathogens present in or on raw meat can survive that range. The surface dries first, which can further insulate the interior. A piece of jerky can be perfectly dry and still carry a pathogen load.
The accepted answer is a separate heat step, either before drying or after it, bringing the meat to a specified internal temperature. That means measuring it rather than estimating, so an instant read digital thermometer is not optional equipment here. Guidance commonly cited is around seventy one degrees Celsius for whole muscle beef and around seventy four for poultry, held briefly. Some authorities specify heating before drying, some after, and some accept either.
Check your own national food safety authority for the current temperature and sequence rather than relying on any website, including this one. This is the one topic on the site where following a general guide instead of official current guidance is a genuinely poor idea.
A marinade with salt and acid contributes to safety and is not a substitute for the heat step. Curing salts contribute and are also not a substitute. The heat step is the control.
None of this makes jerky difficult. It adds one oven cycle to a process that already takes most of a day.
Choosing the meat
Lean, and then leaner. Fat does not dry. It stays soft, it goes rancid within weeks, and it is the single largest limit on how long jerky keeps. Trim every visible piece of fat before you start, and then trim again.
Good cuts. Beef topside, silverside, eye of round, and flank. Venison is excellent and naturally very lean. Turkey breast works well.
Poor cuts. Anything marbled, including most premium steak cuts. Marbling is exactly what you do not want here, which means the cheap cuts are the correct ones, and jerky is one of the few cases where that is straightforwardly true.
Ground meat can be made into jerky with a jerky gun, and it carries higher risk than whole muscle because any surface contamination is distributed throughout. If you are making it, the heat step matters even more.
Slicing
Freeze the meat partially first, around an hour, until firm but not solid. This is the difference between neat slices and a frustrating afternoon, and it is the tip most worth knowing.
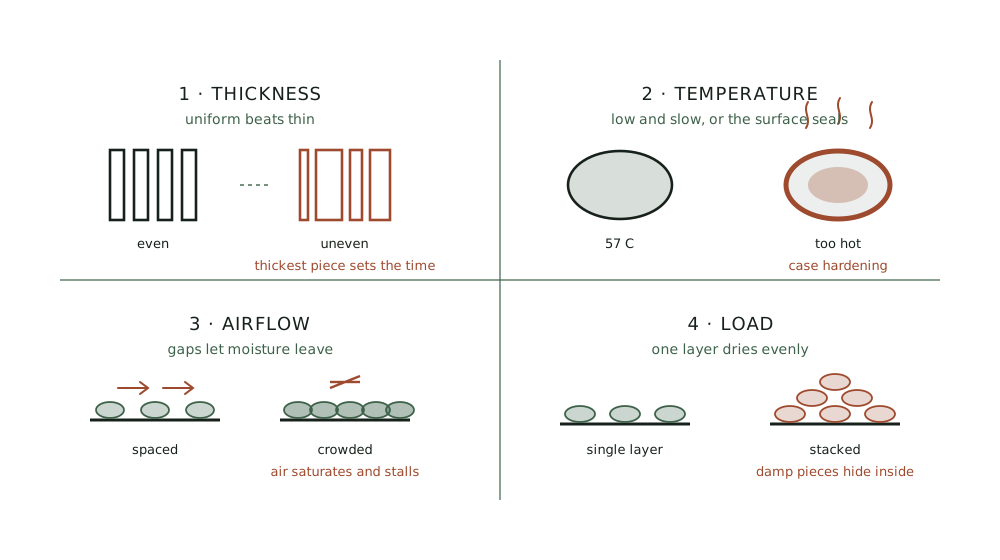
Slice to about five millimetres, uniformly. Thickness matters here for the same reason it matters everywhere else in this hub: the thickest piece sets the drying time.
With the grain gives chewy, traditional jerky that pulls apart in strands.
Across the grain gives a more tender result that breaks cleanly. Better for anyone who finds traditional jerky hard work.
Trim any silverskin, which never becomes pleasant.
Marinades
Marinade does three jobs: flavour, salt for texture and preservation, and acid.
A baseline that works. Soy sauce, Worcestershire sauce, black pepper, garlic powder, and onion powder. That is a genuinely good jerky and everything else is variation.
Salt matters structurally, not just for taste. It draws out moisture and firms the texture. Do not reduce it far below what a recipe specifies.
Acid from vinegar, citrus, or Worcestershire helps texture and contributes to the overall picture.
Sweetness from honey, maple, or brown sugar balances the salt and helps the surface. Use a light hand, since sugar can make the surface tacky.
Curing salt containing sodium nitrite is used in some recipes. It contributes to safety and colour and is not a replacement for the heat step. If you use it, follow the quantities on the packet exactly, since these are not ingredients to estimate.
Marinate refrigerated for four to twenty four hours. Longer is saltier rather than better.
Drain thoroughly and pat dry before drying. Surface liquid is water the machine has to remove.
Drying
Higher than anything else in this hub. Most machines have a jerky setting near their maximum, and this is one case where the top end is correct rather than excessive. a larger six tray machine covers both the range and the capacity a batch needs. This is also why the machine guide treats temperature range as the specification that matters.
Lay strips in a single layer without touching. Overlapping pieces stay damp where they meet.
Four to eight hours depending on thickness, load, and machine.
Blot surface fat partway through. Even trimmed meat renders a little, and blotting it away extends how long the finished jerky keeps.
The doneness test
Cool a piece first, as always. Warm jerky feels softer than it is.
Bend it. Correctly dried jerky cracks along the bend and does not break in half. If it snaps cleanly it is overdried, which costs texture and nothing else. If it bends without cracking, it needs more time.
There should be no moist or shiny interior when a piece is torn.
Variations worth making
Once the basic method is routine, the variations are where jerky becomes worth the afternoon.
Teriyaki. Soy, mirin or a little sugar, ginger, and garlic. Sweeter and softer in flavour, and the sugar makes the surface slightly tacky, which some people prefer.
Peppered. The baseline marinade with a heavy coat of cracked black pepper pressed onto the strips before drying. Simple and probably the best of the lot.
Chilli and lime. Lime juice, chilli flakes, cumin, and a little sugar. The acid works well on texture and the result is brighter than most jerky.
Biltong style. A different tradition entirely, using vinegar, coarse salt, and toasted coriander seed, air dried rather than heat dried, and usually thicker cut. Worth knowing that biltong and jerky are different products with different methods rather than regional names for the same thing.
Salmon. Works well and behaves differently from red meat. It is more delicate, dries faster, and the guidance on heat steps for fish differs from that for meat, so check it specifically rather than assuming.
Mushroom jerky. Thick portobello slices marinated in the same mixtures produce something genuinely good, and it carries none of the safety considerations on this page. A reasonable first project for anyone hesitant about the meat version.
Storage, and why jerky is different
Jerky does not keep like dried fruit, and expecting it to is a common error.
Fat is the reason. Even lean meat holds some, and fat oxidises regardless of how dry the product is. This puts a ceiling on shelf life that no amount of drying removes.
Realistic expectations: one to two months at room temperature in an airtight container, several months refrigerated, and up to a year frozen.
Cool completely before packing, or condensation forms inside the container.
Vacuum sealing and oxygen absorbers both help considerably, since oxygen is what turns the fat. The storage guide covers both.
Watch for any sign of moisture in the container in the first few days. Jerky that was packed slightly underdried will show it quickly.
RUN THE NUMBERS
Illustrative figures. Follow your national guidance for the heat step rather than these numbers.
| Stage | Detail |
|---|---|
| Cut | Lean beef topside, silverside, or eye of round |
| Preparation | Partially freeze 1 hour, slice to 5 mm |
| Marinade | 4 to 24 hours, refrigerated |
| Heat step | To the internal temperature your national guidance specifies |
| Drying | 4 to 8 hours, single layer, no overlap |
| Done when | Cracks on bending, does not snap |
| Yield | Roughly 1 kg raw becomes 350 to 400 g |
| Keeps | 1 to 2 months airtight at room temperature |
Meat loses around sixty to seventy percent of its weight, a much smaller reduction than fruit or vegetables, which is worth knowing before you buy for a batch.
Cost, honestly
Jerky is the one item in this hub where the home versus shop comparison is worth spelling out, because retail jerky is priced remarkably highly.
A kilogram of lean beef yields roughly three hundred and fifty to four hundred grams of finished jerky. That is a substantial reduction, and it means the raw meat cost per finished gram is around three times the shelf price of the cut you started with.
Even so, home jerky comes out well ahead of retail, which typically sells in small packets at prices that assume a snack rather than a food. The gap widens further if you use cheaper cuts, which as noted above are also the correct ones.
The other saving is control. Commercial jerky often carries a good deal of sugar and salt, and making it yourself lets you decide both.
The honest cost is time rather than money. A batch is a marinade the night before, an oven cycle, and most of a day in the machine. That suits someone making jerky occasionally in quantity far better than someone wanting a handful on a Tuesday.
WHAT GOES WRONG
A rancid or off smell after a few weeks. Fat. Trim harder next time, blot during drying, and store cooler.
Jerky that snaps like a biscuit. Overdried. Not dangerous, just disappointing. Pull it earlier.
Soft, damp pieces among dry ones. Uneven thickness or overlapping strips. Slice uniformly and lay in a single layer.
Ragged, torn slices. Meat not partially frozen before slicing.
Overwhelmingly salty. Marinated too long, or too much salt for the quantity. Twenty four hours is a maximum.
Condensation in the storage container. Packed warm, or packed underdried. Cool fully and check the bend test again.
DO THIS NOW
- Look up your national food safety authority's current guidance on jerky before making any, and note the temperature and whether it applies before or after drying.
- Buy a lean cut rather than a premium marbled one, and trim every visible piece of fat.
- Partially freeze for an hour before slicing, and cut to a uniform five millimetres.
- Test doneness by bending a cooled piece. It should crack and not break.
Next
Temperature range is the specification that matters most for jerky, and it is the thing most cheap machines get wrong. Shelf or stackable covers what to check before buying.
Jerky has the shortest shelf life of anything in this hub, so storage technique matters more rather than less. Storing dried food so it lasts years covers oxygen absorbers and vacuum sealing.