Guide
Drying Fruit Properly
Thickness, the acid dip, the doneness test, and the conditioning week that decides whether a jar survives to February.
As an Amazon Associate this site earns from qualifying purchases. Links to products may be affiliate links. This costs you nothing extra and does not change what gets recommended. Nothing here is medical advice.
Fruit is where nearly everyone starts, and it deserves to be. It is forgiving, it needs no blanching, the result is something people actually eat, and a failed batch costs an afternoon rather than a shelf of jars.
It also has four steps that separate a jar you finish from a jar you throw away, and three of them are routinely skipped.
The apple tray
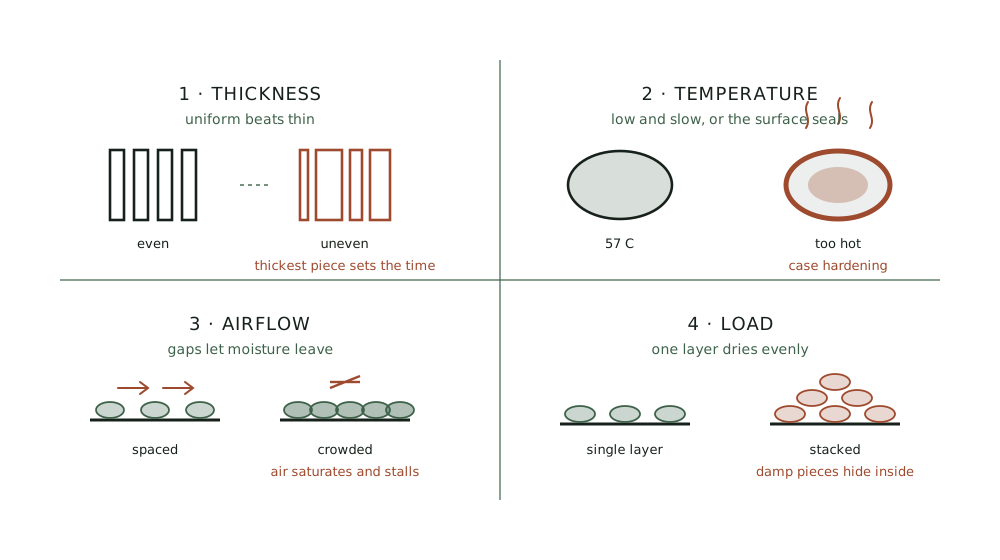
Six apples, cored and sliced to about three millimetres, dipped for two minutes in water with the juice of one lemon, laid in a single layer with gaps, dried at about fifty seven degrees Celsius for roughly eight hours, then conditioned in a clear jar for a week.
That is the reference batch used across the drying hub. Every fruit below is a variation on it, and if you make it once you will understand every other page in this hub.
Thickness, and why uniformity beats thinness
Three millimetres is the target for most fruit. The number matters less than every piece being the same.
Drying time is set by the thickest piece in the tray. Everything thinner sits in warm moving air long past its own finishing point, losing texture and colour while it waits. A tray of hand-cut slices ranging from two to six millimetres produces some pieces that are brittle and dark and others that are still damp, and no amount of extra time fixes that, because the extra time makes the thin ones worse.
This is why a mandoline is the most useful tool in this category. a handheld mandoline with adjustable thickness slices six apples in under two minutes with every piece identical. Use the guard, always.
Thinner than three millimetres dries faster and turns brittle rather than chewy. Thicker than five takes considerably longer and is where case hardening starts to appear. Somewhere in between is right for almost everything.
Cut across the fruit rather than along it where you can. Apple rings hold together better than wedges, and they dry more evenly because the thickness is consistent from edge to edge.
The acid dip
Apples, pears, bananas, peaches, and apricots all brown as they dry. The reaction is enzymatic oxidation, it starts within minutes of cutting, and by the end of eight hours an untreated tray looks distinctly unappetising.
Two minutes in water with the juice of one lemon per litre prevents almost all of it. Ascorbic acid powder works better still and costs more. Either way, slice directly into the acidulated water so pieces are protected from the moment they are cut, then drain well before laying them out.
This is cosmetic rather than a safety measure. Brown dried apple is perfectly good food that nobody in your household will eat, which makes it a real problem rather than a vanity one.
Drain thoroughly. Surface water added at this stage has to be removed by the machine, and a soaking wet tray adds an hour or more.
Fruit that does not brown, including berries, cherries, grapes, mangoes, and pineapple, needs no dip at all.
Skins, and the ones that resist
Some fruit is wrapped in a waxy cuticle that water cannot cross, which means it will sit in the machine almost indefinitely without drying.
Grapes, blueberries, cranberries, and small plums all behave this way. Two solutions work. Halve them, which is tedious and reliable. Or check them, which means dipping briefly in boiling water until the skins craze, then straight into ice water. Thirty to sixty seconds is usually enough.
Skip this and you will have a tray of fruit that looks unchanged after twelve hours, which is one of the more baffling first experiences in home drying.
Apple and pear skins are permeable and can stay on. Peeling is a matter of preference rather than necessity, and the skin holds a good deal of the flavour.
Temperature and time
Fifty five to sixty degrees Celsius for almost all fruit.
Higher is the most common serious mistake. Above about sixty five the surface dries into a shell before the interior has released its moisture, and that shell then prevents anything further from leaving. This is case hardening. The piece feels done, stores badly, and moulds in the jar weeks later.
Lower than fifty is unnecessarily slow and, in humid conditions, can leave fruit in the range where spoilage organisms are still active for too long.
Times vary enormously with humidity, load, and machine. Six to twelve hours covers most fruit at three millimetres. Treat any number in a manual as an estimate and test rather than trusting the clock.
A full machine takes noticeably longer than a half full one, which is the most common reason a batch is not ready when a recipe said it would be.
The doneness test
Cool a piece first. Warm fruit feels softer and more pliable than it truly is, and testing hot fruit is how underdried batches get put away.
Take a piece out, wait two minutes, then tear it. Correctly dried fruit is leathery and pliable, tears cleanly, and shows no beads of moisture at the torn edge.
Then squeeze a small handful. Pieces should spring apart. If they clump and stick together, moisture remains.
Weight is the most reliable measure if you want one. Fruit typically loses eighty to ninety percent of its weight, so a kilogram of apples yields somewhere around one hundred to two hundred grams. Weighing in and out removes the guesswork entirely.
Overdrying costs texture and nothing else. Underdrying costs the batch, weeks later, when you open the jar.
Conditioning
This is the step that separates dried fruit that keeps for a year from dried fruit that grows mould in November, and almost every guide omits it.
Even a well dried batch has variation between pieces. Conditioning equalises the remaining moisture across the whole batch and exposes any piece that was not dry enough.
Pack the cooled fruit loosely into a clear glass jar, about two thirds full. Seal it and leave it somewhere you will look at it daily, for seven to ten days. Shake it once a day to redistribute.
Watch the inside of the glass. Any condensation means moisture is still present, so return the whole batch to the machine for another hour or two and start conditioning again. No condensation after a week means the batch is genuinely ready.
It costs nothing but patience and it is the single highest value habit on this page.
Storage
Airtight glass, as little headspace as practical, somewhere dark and cool.
Light degrades colour and vitamins. Heat roughly halves shelf life for every ten degrees. A jar at the back of a cool cupboard will outlast an identical jar on a shelf above the oven by a very large margin.
Label with contents and date. Dried apple and dried pear are genuinely indistinguishable at eleven months, and so are most stone fruits.
Realistic life, stored well: one year or more for most fruit, with flavour and colour declining before safety does. Vacuum sealing or an oxygen absorber extends it considerably for anything you intend to keep beyond a year.
Fruit worth drying, and fruit that is not
Not every fruit rewards the effort, and knowing which is which saves a wasted afternoon.
Excellent. Apple, pear, mango, apricot, peach, banana, pineapple, and figs. All have enough structure and sugar to produce something with texture and concentrated flavour.
Very good with preparation. Grapes into raisins, plums into prunes, and cherries, all of which need halving or checking first. Strawberries dry well and shrink dramatically, which surprises people.
Difficult. Citrus flesh turns bitter and papery, though the zest and thin whole slices for garnish both work beautifully. Melon dries to almost nothing.
Not worth it. Watermelon is essentially water with a little sugar, and a whole tray reduces to a few translucent scraps.
The best candidate of all is fruit that is past its best. Slightly soft, bruised, or overripe fruit dries perfectly well, since you are removing water rather than relying on texture. This is the single most effective way to stop throwing fruit away, and it turns a reduced-price box into a year of snacks.
One caution: fruit that has already begun to spoil should be composted rather than dried. Drying preserves what is there, including anything that has already started.
RUN THE NUMBERS
Illustrative figures based on typical produce. Times vary with humidity, load, and machine.
| Fruit | Prep | Temperature | Typical time | Done when |
|---|---|---|---|---|
| Apple | 3 mm rings, acid dip | 57 C | 7 to 10 h | Leathery, pliable |
| Pear | 3 mm slices, acid dip | 57 C | 8 to 12 h | Leathery, no moisture |
| Banana | 4 mm, acid dip | 57 C | 8 to 10 h | Chewy or crisp to taste |
| Mango | 4 mm, no dip | 57 C | 8 to 12 h | Pliable, slightly tacky |
| Strawberry | 5 mm slices | 57 C | 8 to 12 h | Leathery |
| Grape | Halved or checked | 57 C | 12 to 24 h | Raisin texture |
| Apricot | Halved, acid dip | 57 C | 10 to 16 h | Pliable, no wet centre |
Fruit loses roughly eighty to ninety percent of its weight, so a full five tray machine of apples reduces to a modest jar. Knowing that ratio before you shop stops the disappointment of drying two kilograms and getting a small handful.
WHAT GOES WRONG
Brown, unappealing slices. No acid dip. Two minutes in lemon water fixes it entirely.
Some pieces brittle, some damp. Uneven thickness, or a crowded tray. A mandoline and a single layer with gaps solve both.
A hard surface with a soft centre. Case hardening from too high a temperature. Lower it and extend the time.
Grapes or berries that never dry. Waxy skins. Halve them or check them in boiling water first.
Mould in the jar months later. Underdried, and not conditioned. The conditioning jar exists to catch exactly this.
Fruit stuck to the tray. Sticky fruit needs a solid sheet rather than mesh, and lifting while still slightly warm is easier than when cold.
DO THIS NOW
- Slice six apples to a uniform three millimetres, straight into water with the juice of one lemon.
- Drain well, lay in a single layer with gaps between pieces, and dry at about 57 C.
- Cool a piece before testing it, and squeeze a handful to check they spring apart rather than clump.
- Condition in a clear jar for a week, shaking daily and watching the glass for condensation, before storing.
Next
If you are still choosing a machine, or your batches are drying unevenly, shelf or stackable covers the airflow difference that causes it.
Herbs run on completely different rules and take three hours rather than ten. Drying herbs without losing the flavour covers the low temperature that keeps the oils in.