Guide
Fermenting Equipment, and What You Can Skip
A jar, a weight, and a way for gas to escape. Everything beyond that is convenience, and here is which conveniences are worth buying.
As an Amazon Associate this site earns from qualifying purchases. Links to products may be affiliate links. This costs you nothing extra and does not change what gets recommended. Nothing here is medical advice.
Fermenting has the lowest equipment requirement of anything on this site. A jar you already own, some salt, and a way to keep the vegetable under the brine will produce excellent sauerkraut indefinitely.
Everything sold beyond that is convenience rather than capability, which is unusual in a category with this much equipment marketing. This page sorts the genuinely useful from the merely available.
The three functions
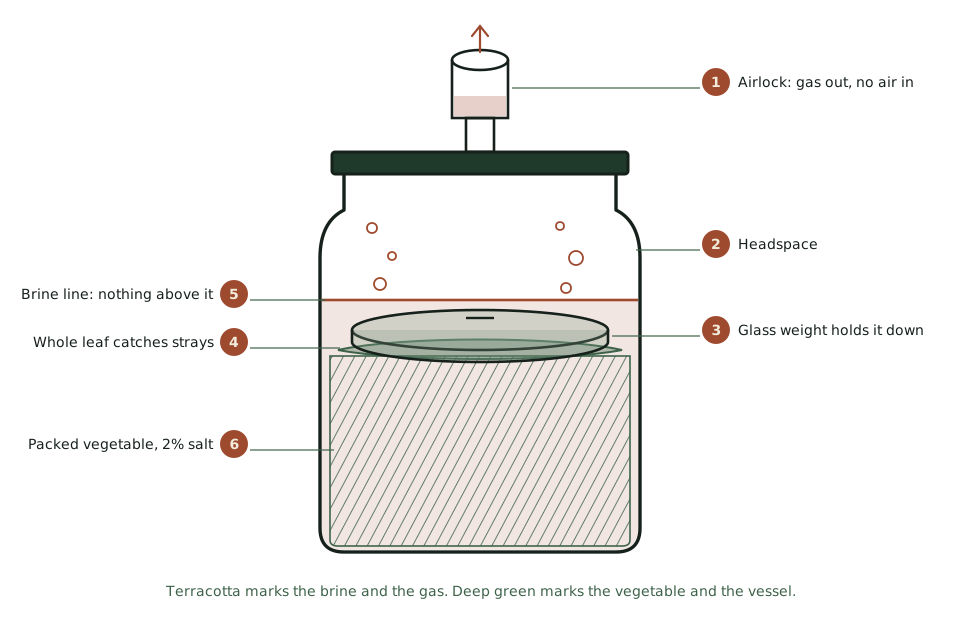
Any setup has to do three things. Understanding them makes the shopping obvious.
Hold the vegetable under the brine. Lactic acid bacteria work without oxygen; mould and kahm yeast need it. Anything above the surface is in the wrong environment, and this is the origin of nearly every failed jar. The fermenting hub covers why submersion matters more than any other single factor.
Let carbon dioxide out. Fermentation produces gas, and a rigidly sealed glass jar builds pressure. Something has to give, and you do not want it to be the jar.
Keep new air out, ideally. Not strictly required, and it reduces surface yeast noticeably.
A vessel, a weight, and a lid arrangement. That is the whole list.
Vessels
Wide mouth mason jars are the right answer for almost everyone. One litre suits a single cabbage. Wide mouth matters because you need to reach in to pack, weight, and later retrieve, and a narrow neck makes all three awkward.
Glass is ideal: non porous, non reactive, and transparent so you can see what is happening. Being able to watch the jar is a genuine advantage over an opaque crock, particularly while learning.
Larger glass fermenting jars step up to around two litres with the airlock and weight already fitted. two litre fermenting jars with airlocks and weights is that middle ground, and it is the point at which packing by hand starts to want a tamper.
Traditional crocks use a water channel around the rim as a permanent airlock, which is elegant and requires topping up. They hold large quantities, they are heavy, they are expensive, and you cannot see inside. Excellent for a household fermenting a sack of cabbage each autumn and unnecessary for anyone else.
Avoid. Anything metal that is not stainless, since acid and reactive metal do not mix. Most plastics, which can hold odours and are permeable over long periods. Anything with a rubber seal that clamps rigidly, unless you intend to burp it.
Weights
This is the one accessory worth buying rather than improvising.
Glass fermentation weights are made for the job: heavy enough to hold vegetables down, non porous, and sized to sit inside a wide mouth jar. glass fermentation weights sized for wide mouth jars is the pattern. They cost little and they solve the single most common cause of failure.
A whole cabbage leaf folded over the surface underneath the weight catches stray shreds. Free and worth doing every time.
A small jar filled with water inside the larger jar works and is what people improvise with. It takes up space and it works.
A sealed bag of brine conforms to the shape of the vessel and seals the surface almost completely. Use brine rather than water, so a leak does not dilute the ferment. Effective, and less pleasant to look at.
Do not use stones from the garden, anything porous, or anything metal that is not stainless.
Check the weight on day two. Vegetables soften and settle, and a weight that sat correctly at packing is sometimes proud of the brine by day three.
Lids and airlocks
Three approaches, in ascending order of convenience.
A loose lid, burped daily. Screw the lid on lightly and open it once a day during the first week to release pressure. Costs nothing, works perfectly, and requires you to remember. Set a reminder for the first seven days, when gas production is most vigorous.
Water airlocks. The traditional S-shaped or three piece airlock, fitted through a grommet in a lid. Gas bubbles out through the water and no air comes back in. They work extremely well and the water needs topping up occasionally. a fermentation kit with airlock lids and glass weights covers lids, airlocks, and weights together, which is the sensible way to buy them.
Waterless silicone valves. A one way silicone nipple that opens under pressure and closes otherwise. No water, no topping up, no maintenance, and a lower profile so jars stack. waterless silicone airlock caps that need no topping up is the pattern. Slightly less absolute than a water airlock and considerably easier to live with.
Waterless valves are what most people settle on. Water airlocks are marginally better and marginally more fuss.
Things you do not need
Being direct about this, since the category has a lot of accessories.
Starter cultures. Vegetables carry their own lactic acid bacteria. Adding a starter is unnecessary for sauerkraut, kimchi, and brined vegetables. Milk and kombucha ferments do need cultures; vegetables do not.
Special fermenting salt. Any salt without iodine or anti-caking agents works. Fine sea salt, kosher salt, or plain pickling salt. There is no need for a product marketed for fermenting.
pH meters and test strips. Interesting and unnecessary for vegetable ferments. Taste tells you whether the acid has developed, and the method is self indicating.
Fermentation chambers and temperature controllers. Room temperature is correct. If your kitchen is very warm, a cooler cupboard solves it for nothing.
Pounders and tampers, below about two kilograms. Your fist does the job in a jar. At scale, in a crock, a tamper earns its place.
Multiple specialised vessels. Four identical jars beat four different systems, because you learn one thing and repeat it.
What is genuinely worth buying
Ranked by how much difference it makes.
A kitchen scale, if you do not have one. Two percent salt by weight is the core of the method, and volume measures for salt vary by nearly half depending on crystal size. This is the highest value purchase on this page and it is not a fermenting product at all.
Glass weights. They fix the failure mode that ruins most batches.
An airlock arrangement. Either kind. It removes the daily burping obligation, which is the thing most likely to be forgotten.
More wide mouth jars than you think. Ferments run for weeks, so a jar is occupied for a month at a time. Two jars means you are always waiting; six means you can keep something going continuously.
A tray. Ferments overflow in the first days, reliably. Something under the jar saves the counter.
That set costs very little and covers everything.
Cleaning and reuse
Fermenting equipment does not need sterilising, which surprises people coming from brewing or canning.
Wash everything in hot soapy water and rinse thoroughly. That is sufficient, because you are deliberately encouraging a microbial population rather than excluding all of them, and the salt and developing acidity handle the rest.
Do rinse very thoroughly. Detergent residue affects flavour and can interfere with the culture.
Airlock components come apart and should, since the crevices hold residue. A small brush handles them.
Glass weights go in the dishwasher. Stainless lids do too. Silicone gaskets last longer hand washed.
Replace silicone parts when they lose their spring or start to smell permanently of the last batch. They are cheap and they are the component that wears.
Setting up a small production line
Once fermenting becomes routine the constraint stops being knowledge and starts being logistics, since every jar is occupied for three or four weeks.
Work in batches of three or four jars. The preparation is the same effort whether you fill one jar or four. Shredding two cabbages takes barely longer than one, and the weighing and salting scale linearly with no extra setup or cleanup.
Stagger by a week. Fill three jars this weekend and three next, and you reach a steady state where something is always ready rather than everything arriving at once.
Keep a dedicated shelf. Ferments want a consistent, moderate, out of sunlight spot. A shelf in a cupboard or a corner of a pantry works, and having a fixed home means you check them rather than forgetting them.
Label with the date. Masking tape and a pen. At three weeks you will not remember which jar was started when, and the difference between week two and week four is substantial.
Keep the tray permanently. Overflow happens on every batch. A baking tray under the whole group saves repeated cleaning.
Have somewhere to put the finished jars. This is the constraint people hit last and hardest. A litre of sauerkraut takes real refrigerator space, and four litres takes a shelf. Plan for it before you make six jars at once.
RUN THE NUMBERS
Illustrative comparison. Prices vary by region and this is not a promise about your results.
| Setup | Cost | Effort | Best for |
|---|---|---|---|
| Jar, loose lid, improvised weight | Almost nothing | Daily burping | Finding out if you like this |
| Jar, glass weight, loose lid | Very low | Daily burping | The honest minimum |
| Jar, glass weight, waterless valve | Low | None | Where most people land |
| Jar, glass weight, water airlock | Low | Occasional topping up | Marginally better seal |
| 2 litre fermenting jar with fittings | Moderate | None | Larger batches |
| Traditional crock | Highest | Water channel topping up | A sack of cabbage each autumn |
A cabbage and eighteen grams of salt is the entire consumable cost of a litre of sauerkraut. Equipment is a one time purchase measured in a handful of batches.
WHAT GOES WRONG
Mould on the surface. Something floated above the brine. A proper weight and a cabbage leaf cover fixes it permanently.
A cracked or bulging jar. Sealed rigidly with no way for gas to escape. Burp daily or fit an airlock.
Brine all over the counter. Normal in the first days, and a tray solves it.
Off flavours from the vessel. Reactive metal or a porous plastic. Use glass and stainless.
Detergent taste. Not rinsed thoroughly enough.
Everything waiting on one jar. Buy more jars. This is the most common practical bottleneck and the cheapest to solve.
DO THIS NOW
- Check you have a kitchen scale. If not, that is the purchase to make before any fermenting equipment.
- Buy glass weights sized for wide mouth jars. They fix the failure that ruins most batches.
- Decide between daily burping and an airlock honestly, based on whether you will remember.
- Buy more jars than you think you need, since each one is occupied for three or four weeks.
Next
For the batch this equipment is for, and the fifteen minutes of work that produces a litre of sauerkraut, see sauerkraut from one cabbage.
Cucumbers and other whole vegetables need a brine rather than dry salting, and a different weighting approach. Brine pickles that stay crunchy covers both.